Showing posts with label Hat. Show all posts

Tuesday, November 18, 2014

49er Fever Hits Beanie on a Bulky

 
Using my Team Spirit yarn I've been knitting up some beanies for a 49er party at my house.  This time I wanted to experiment with knitting it in the round.  I knew the ribbing couldn't be done circularly and it reminded me that Diana Sullivan had an easy technique to get this done.  I used the method she demonstrates in her sock video. It can be found on part one of Knitting a Sock on the Standard Machine.

From there I followed the Regular Guy Beanie instructions.  It's a free pattern on Ravelry.  I've written up what I've done.  Of course the instructions make perfect sense to me.  It makes an adult woman sized beanie.  So, you guys give it a try and let me know if you have any questions.

Beanie on a Bulky circularly knit


Tuesday, October 1, 2013

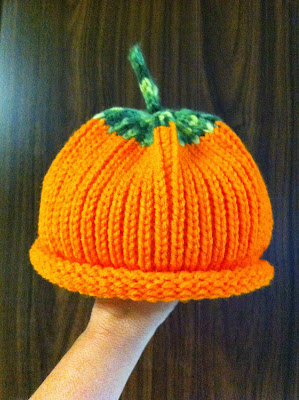
Lil Punkin Hat... well not quite

Using my bulky Toyota KS650 punchcard machine I tried my hand at making the Lil Punkin hat by Baby Jane Knits.  It's a free pattern if you belong to the "Fun with Big Brother" yahoo group. The group is free too.  So, give it a try.  Look for the pattern under files and look for Baby Jane Knits.

I punched the card suggested, but I don't think the card I have is compatible with my Studio machine.  I had a 1X1 punch card and I lined it up and they just didn't quite match in size and shape. Anyhow the card didn't work.  SO, I decided to use the 1X1.  It still made the most fricking adorable pumpkin hat.

The pattern said it was a pretty small hat and gave instructions on how to make it bigger.  I casted on 60 needles and when it came to the slip rib section I knitted 48 rows.  It still made a pretty small hat.
As luck would have it I was babysitting a 5 year old and was waiting for him to come home from school.  I thought he'd be a perfect model, so I could tell what size the hat should be and how to adjust it.  I was prepared if he fell in love with it to let him have it.
I thought I'd have to coax it on him, because he's all boy ruff and tumble, snip and snails and puppy dog tails.  He's still 5 and instantly fell in love with it and wouldn't take it off.  Made me feel good that he loved it as much as I did.  I did find out it is still a little smaller than I'd like, but for just wearing and having fun it was perfect.
Since I was knitting at someone else's home I didn't have all my manuals with me and as it always is I needed to make an i-cord and didn't know how to set my machine.  I knew it needed to slip in one direction, but I so seldom set my machine to slip anything I need the manual.  I did have my computer and all I could find was how to make i-cord on a brother machine.  I needed Studio.  I came across this handy little video that was perfect and saved the day.  I-Cord by Crystal Sutherland.  It is a manual way of making i-cord using knitting machine needles.  Since I only needed to make a small stem on my hat making i-cord in this manner was still faster than using knitting needles.  I hung 3 stitches from the top of my hat and began.  To get my rhythm going I just remember to always wind in a clockwise manner.

Tuesday, April 23, 2013

Preemie Hats on a Sunny Day

Today was the meeting of a group of machine knitters I've known for about 3 years now.  I really enjoy getting together with these ladies.  We talk about our machine knitting endeavors of the past month.  Share some hand knitting projects.  We have lunch together.  Then we'll either demonstrate a technique or a pattern.  Today the meeting was at Susan's house and she decided we'd make preemie hats for donation to our local hospital.  Susan is great about collecting hats and blankets that we've made and getting them to a worth charity.  Not to mention all the knitting and crocheting she does on her own for charity.  She'll take knitted square donations and turn them into a beautiful lap blankets for charity.  So, when she asks for knitting help I ask, "What do you need?"

Susan set up 3 standard knitting machines for us to work on.  After lunch we got right on it.  Pairing up and using a pattern she provided.  At first I read the pattern to my friend Desiree as she knitted a hat.  As she sewed up her hat I knitted my hat.  Desiree helped me knit on a Brother machine.  I have zero experience with them.  It was a lot of fun picking out a pattern for an electronic machine.  She showed me how to zero in on the part of the pattern I wanted to knit.  Then helped me fix a mistake that was probably made by me, but we blamed it on the electronics.  It doesn't talk back.

After about 2 hours our group had 7 hats ready for some precious preemie baby heads.  My son was a preemie and I still have the little knitted hat he was given in the hospital.  Saving it for Grand kids, but now that I think about it I hope none of them are preemies.  I may have to rethink that and just keep it as a memento.  A remembrance of a serious time in my child's life and the good thoughts sent my way by a sweet stranger.

See my Ravelry project for details on how I made this particular hat.

Thursday, December 8, 2011

Day 9 of Completion Challenge

I've been wanting to make a beanie on my knitting machine for a long time.  That's what my daughter wants.  "Nothing fancy just a beanie."  I wanted to make a beanie with a fitted crown.  Not the typical gathered tops I have done.  They just don't look like beanies.  This is based on a hand knit pattern in the round.  I knew I couldn't do it in the round on the machine just yet, but I knew I could do it flat.  That's OK one of my strengths is the mattress stitch.  One can hardly tell there is a seam from the outside when I do it.
I found this beanie pattern on Ravelry it's called "Regular Guy Beanie."  The first example of it I found the gal had knitted it on her knitting machine.  No written conversion, but I decided it was time to quit thinking about it and just give it a go.

I looked up how to do 2X2 ribbing in my manual.  I read the written pattern for the hand knit version to figure out when to do decreases.  What I really liked about this hat was the spiral chains on the crown created by the decreases.

With my plan written on the back of a recycled envelop I dove in.  I am very pleased with how it turned out even though there were problems.  I also forgot to so some plain knitting rows, but it still fits quite nice.
Only thing I kind of don't like, but will keep to myself when my daughter wears it is the row of holes where the ribbing attaches to the stockinet.  I've been told to next time pick up the purl bump on the stitch next to it to avoid the hole.  There were 2 set ups for doing 2X2 ribbing in my manual I'll have to try the 2nd one and see if it makes a better transition.

**Written pattern for the machine (knitted circularly) can be found here.  If you want it on the mainbed only click the link above to the hand knitted pattern.**

Friday, October 28, 2011

Working on a Kooky Hat


I saw this kooky hat on Ravelry and thought I just have to make one, because it looks so fun.  Will anyone actually wear it?  I don't know.

The instructions begin with the headband.  Mine per the instructions came out very tiny.  I'm not sure a newborn could put this on.  I'm not discouraged.  The yarn asked for was really too big for my standard gauge machine.  It knitted fine, but was difficult to pull the carriage back and forth.  Just doing the head band made me realize I needed smaller yarn or I needed to move to my bulky.  After consulting with my machine knitting mentors I'm moving to the bulky.


I just thought the headband looked so cool!  It is one strip with eyelets about every 18 rows.  The 2nd strip is knit plain.  Then you weave one into the other through the eyelets.  I knew it was a bust, but I was just tickled at how wonderful it looked.  My mind was full with the creative possibilities.

A completed hat can be viewed on Ravelry at "Look at this crazy hat.com"  I'm still working on mine.  I'm hoping one of my teens will wear it skiing this December.

Friday, September 16, 2011

My New Cap

I bought a pattern from Newton's Yarn Country at a recent class at my guild called the "Hollywood Swag Cap and Scarf."  I'm always looking for something my teen daughter might like.  I'm also always looking for small cool projects to do on my knitting machine.

What I liked about this pattern was the texture of the cap.  It really had an interesting look.

Again blogger won't turn my photo in the correct direction, but you get the idea of what it should look like.
To get the wavy pattern of this hat was fairly easy and the pattern really explained it well.  It sort of reminded me of the Mohair scarf patterns I really like doing.  It also reminded me of the entrelac technique in that you work with almost all the needles in hold and only work on one section at a time.

Here is the finished cap.  It is unsteamed here.  I kind of like it that way.
The cap is finished and then rehung to do the brim.  I found the brim to be kind of boxy and long.  My teen said it made her feel like a duckbill platypus (don't take it personally she hasn't liked a single hat I've made so far.)  I reshaped the brim interfacing to be smaller and curve more.  Using the mattress stitch I was able to pull in the squared off sides of the brim to a more curvy baseball hat sort of brim.  This created a lump of knitting on each side inside brim where the corners were pulled in, but it's not noticeable to the eye.


All and all I really like the hat.  I know once my machine knitting friends see it they'll want a pattern too.  I know Newton's doesn't sell them on their website, but I'm sure if you emailed them you could buy it from them.  I got to thinking maybe the designer of the pattern might sell online and she does.  Only problem is she's on vacation until the end of September.  Not a problem for her she in beautiful Costa Rica.  She sent me a picture.  WOW!  You can contact Linda Jensen through her etsy site "LindasCrafts" beginning in October if you're interested in her pattern.

**Pattern for cap is not available at the Newton's website.  I expect you need to see them in person to get the pattern.  BUT!  You can buy it from the designer at her Esty shop.  Click on "LindasCrafts" for a direct link to pattern.

Sunday, February 6, 2011

Punch Cards

This is a zigzag pattern card.  I was given these 2 yarns and I accidently found out they look great together.  I knitted up a quick hat with my Studio 700 standard machine.  I'll be trying at all my 24 stitch pattern cards on the correct machine. :D

Monday, January 31, 2011

Honeycomb Hat

It was a challenge, but I was able to get through it. The pattern can be found on Ravelry. It's called DylaniumKnits Machknit Honeycomb Hat.  It cost $5.  Totally worth it.

Took me about 6 hours to make. I didn't sit for the full 6. I'm sure future hats will be faster now I know how to read the pattern and convert it to my machine.


Oddly enough my experience with the Mohair scarf pattern helped me to understand what I needed to do to make the honeycomb pattern with my bulky machine.

Saturday, January 15, 2011

My 2nd Cupcake Hat Recipient

At first she didn't want her picture taken.  I'm 2 1/2 years old and I'm not in the mood.

I then asked if I could take a picture of her in front of the Christmas tree.  Got to make it fun for them.  And let's face she made it fun for me too.

Wednesday, December 29, 2010

The Cupcake Hat Was A Hit

Here's my 6 year old little friend wearing the hat I made on day 18 of my "25 Days of Diana".  I mailed it to Portland, OR for Christmas.  Her mother said that she put on her hat and coat the next day and was standing by the door ready to run errands.  Normally, she needs prompting to get ready to go.  Hey anything I can do to make a mother's job a tad easier I'm willing to do.

Thursday, December 16, 2010

Day 21 "25 Days of Diana"

I feel like I've learned so much in the past 20 days.  Forcing myself to take some time every day to knit has been so much fun.

Today's project was all about teaching the next generation.  My daughter has been doing some machine knitting, but not a lot.  I help her a lot and today I when she asked to make a hat for her Secret Santa person I thought she's going to do it herself.

We started out watching Diana's threading the machine video.  We moved on to watch the Open Cast on video and Diana's cast-on.  I thought it would be good for her to see that she's not just doing what Mom says, but what other's say on how to operate a knitting machine.

My daughter wanted to make a reversible hat.  I made one a while back and it was really nice.  This pattern is from Knittsings website.

 She did a great job making this hat.  Only had a couple "Mom I don't know what happened here" moments that were easily fixed.  She came out with a hat to be proud to give as a gift.

Tuesday, December 14, 2010

Day 18 "25 Days of Diana"

Today I finished my Fisherman's rib scarf.  Using Diana's Warm Ribbed Scarf Video.  Again I just love the pattern and the yarn.  The 2 make the the perfect pair.  The yarn is Angel Hair Stripes by Sensation at Joann's.
I love this scarf so much it's going to be hard to part with it.  I see it as a gift.  Now who?  hmmmm.

I did one small change from Diana's video in that I used 12 needles instead of 15.  I think I'd like to reduce the width a tad more.  I'm going to play with this pattern a bit more.

I also made last night the most adorable hat.  The pattern isn't Diana's but her ribber lesson videos have given me the confidence to try new things.  I used Diana's Circular Cast-on video for this pattern.  I made Arlene's Bulky Baby Cupcake Hat.  I can't believe how cute this hat is.  I'm going to make more of these too. 


It is definitely a little kid's size, but a big thank you to my son for modeling it for me.


Wednesday, December 1, 2010

Day 6 "25 Days of Diana"

Today I decided to make Diana's adorable Short-Rowed Baby Hat.  Mine came out equally adorable.  It's really good practice for short rowing.  I'll need that talent for my sock DVD when it shows up.  :)

The 10 wedges were easy to do.  Things I had problems with were my yarn mast and making sure the weights got moved.  My yarn mast I think is having tensioning problems on the left side.  It kept tightening up the yarn, getting tangled and generally making me say "What the f*#@" toward the end of the 10 wedges.  Every time I looked up it found a new way to get tangled and intertwined upon itself.  I made it through though and the adorableness of the way the yarn patterned made me very happy.
After I hung the hat to start the hat band I threaded the yarn through the right side of the mast.  No problems with tensioning there.  I'll definitely be looking into what's going on with the left side.

I don't have a lace carriage for my Studio 700.  I don't even know if it comes with one.  Something to look into.  I did my picot edge the old fashion way with a transfer tool.  Moving every other stitch to the needle beside it.  The picot edging is so simple and yet looks so nice.
I was so excited to finish this hat tonight seeing how cute it was turning out. I started around 8pm and finished around 11pm. I'm hoping to do it quite a bit faster when I'm not fighting my yarn mast.

Saturday, November 27, 2010

Day 2 "25 Days of Diana"

In keeping with my new rule that I don't have to complete a Diana project every day.  I just need to work on a Diana project every day I started another Tam.  When DH came back to my craft room and asked if I wanted to watch a movie with him I didn't grit my teeth and say, "No!  I have to finish this hat!"... like I did last night.

Today is nothing fancy.  I'm making another Tam, but I've loosened up the tension.  My first hat the Tam seemed a bit on the small size.  The knitted fabric was so tight I could barely get a weight hung on it.  This time the weights push on nicely.  My daughter and I thought it should have a bit more slouch to it.

I told her she could do better, because this picture looked like an Irish mug shot.

That made her smile.

Pictures tomorrow of the looser tension Tam.

Day One of My "25 Days of Diana"

I have to admit I wasn't really ready to start today. I was out at a Black Friday sale Thursday night at midnight, but was home by 1am WITH my item. Yahoo! I also woke up with a headache stemming from my finicky neck. Did a little too much something on Thanksgiving.

Anyhow that's what having a challenge is all about. One feels compelled to move forward and complete their challenge. I do anyhow. I have been thinking about Diana's Machine Knit Tam since I first saw her video. I didn't know how to do ribbing at the time. I do now. So, that's the first thing I wanted to make.

(First wedge done.  See middle weight not in good place.  Need to keep it high.)
I must clarify any problems I had with working with Diana's video is due to my own dorky machine knitting skills and working with my own machine.  Diana's video is great and teaches well.  I'm just kind of a clutsy machine knitter.  I seem to get my yarn wrapped around the gate pegs in one giant loop on a regular basis.  It is my own doing not Diana's. 

I started the video and I had 2 problems. One is the end stitch the one put back into work each time I don't believe knits every time. It doesn't skip often maybe 2 or 3 times a triangle, but it's something I'm keeping an eye on. I'm not sure if I forget to put the needle into work. Don't think that is it. OR I've notice that needle gets pulled forward and maybe the stitch isn't knitting properly. SO I'm making sure that it is pulled back even with the other needles. We'll see if that solves my problem.


(Such a pretty color.  Wishing now I had practiced on something else.)
My 2nd problem is I'm not moving my middle weight up often enough. If I don't the middle section of my triangle won't knit. First time I noticed it I had 2 rows to fix. I've had to fix it 2 more time, but only one row. I can hear my carriage sounding different when it happens. That draws my attention to where the weight is. Then my attention goes up to the needles and sure enough about 10-20 needles are not knitted. It's a pretty easy fix. Also easy to avoid if one keeps their weights moving up!

With the 2 above observations and corrections it did solve my problems.


My next challenge was doing 199 needles of ribbing.  I've never used my full bed on any machine for any reason.  I was a bit nervous, but dove right in.  What I found out is my bad habit of stealing needles off the ends of my machines finally came back to bite me in the butt.  I was short 3 needles.  I do have replacements just had to quit being lazy, get them out and install them.  Done.


The tension for the ribbing was really tight.  Very hard to push across.  Next one I'll loosen that up.  I forced it across and somehow my ribbing turned out fine.  Next learning curve was attaching the hat to the band.  Turned out I had more stitches on my hat than my band.  I discovered it when I got to the middle and wedge three was going to overlap it by quite a bit.  So, I decided from this point on I'd hang the beginning and end of each wedge on 1/6th of the needles.  This worked out well.  I had to hang 2 stitches on one needle here and there.

Next I needed a refresher on the Kitchener Stitch.  Time for the Beginner Lessons Diana has made.  I watched Diana's video and a few others to stitch up the side seam.  It's not perfect, but I have to say it looks a lot better than I thought it would.  I do still need a lot of practice.

(My daughter always a good sport about modeling my creations.)

It took me 5 hours, but I completed the Tam and it is being blocked on a plate as I type.  What I decided on my "25 Days of Diana" challenge is I don't have to complete a project every day.  This project had many lessons in it that would probably do well to spread over a day or two.

Tam was blocked over a dinner plate.  Worked out quite well.


Monday, November 8, 2010

My Evil Machine Knitting Plan In Full Swing!

Some of you may recall my evil plan to convert teenagers into machine knitters.  My plan involved luring them in to make hats for their "Caring for Cancer Patients" group (CCP).

 
Well, Sunday was the first day I got the group over.  It was a meager showing of 3 members.  Honestly, it was a nice size with which to start.  I don't know how many members the group has, but my hope is this start up group will tell the others how much fun they had.  My plan was to not only get the group acquainted with knitting machines, but to feed them yummy food too.


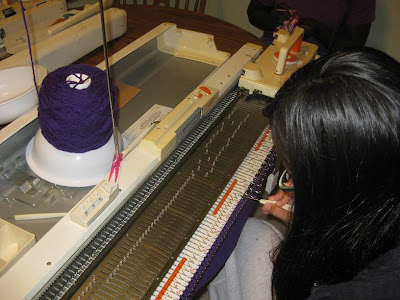
I set up my 2 KS 650 Bulky Toyotas.  Not only are bulky needles easy to see, but my KS 650 bulkys are just easy to use.  I week before our meeting my husband said, "Is Julia coming over?"  Julia is my friend that taught me to machine knit.  I thought what a great idea to have another adult here who knows how to run a knitting machine.  I called up Julia and asked her if she would come and she said, "Yes.  Do you need me to bring a machine?  How about some yarn?"  What a great friend!


Diana the leader of the CCP asked if I needed any money to buy yarn.  I have been given yarn and have bought some very cheaply over the past year.  I decided to let the CCP group have a yarn donation with which to begin.


Julia and I taught the girls how to e-wrap, knit, how to transfer stitches, how to pull the live stitches off on a long yarn tail, and how to sew up the side seam.  My daughter has done a little machine knitting, but the other 2 girls have not done any knitting or crocheting.  They all learned very quickly.  The girls were all amazed at how quickly they could knit up something that looked so beautiful.

At one point the girls had gain more confidence and the carriages on both machines were moving back and forth at a nice clip.  The sounds of both knitting machines in work was music to my ears.

Diana the group leader was in Pennsylvania over the weekend and came home just in time to see the girls handy work.  She was so proud.  One of the gals in the group suggested on several occasions we should get together every 2 weeks to knit hats.


My only comment to that is "Bwah hahahahahaha.  My evil plan was successful!"  We made a date to meet up again during Thanksgiving week.

PS.  I made a yummy appetizer called Chile Relleno Bites.   SO GOOD!

Thursday, June 24, 2010

Hook, Line and Sinker!

Remember my evil machine knitting plan I discussed in a previous post.  I didn't know how well my plan to interest teenagers in machine knitting was going to work until 3 days later.  My daughter's friend came over and asked if she could make another hat.  After I said, "Bwah ha ha ha ha" under my breath we got her set up and off she went knitting her 2nd hat.  While running the carriage back and forth she said, "I love machine knitting.  Some day I want a machine of my own."  I nearly fainted with joy.
My daughter modeling her friend's "Happy Hat."  Since the hats were going to siblings we made this one slightly different with a rolled brim.