Tuesday, October 1, 2013

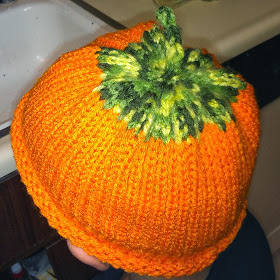
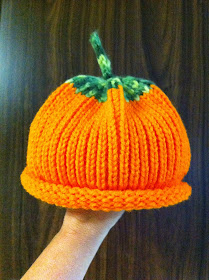
Lil Punkin Hat... well not quite

Using my bulky Toyota KS650 punchcard machine I tried my hand at making the Lil Punkin hat by Baby Jane Knits.  It's a free pattern if you belong to the "Fun with Big Brother" yahoo group. The group is free too.  So, give it a try.  Look for the pattern under files and look for Baby Jane Knits.

I punched the card suggested, but I don't think the card I have is compatible with my Studio machine.  I had a 1X1 punch card and I lined it up and they just didn't quite match in size and shape. Anyhow the card didn't work.  SO, I decided to use the 1X1.  It still made the most fricking adorable pumpkin hat.

The pattern said it was a pretty small hat and gave instructions on how to make it bigger.  I casted on 60 needles and when it came to the slip rib section I knitted 48 rows.  It still made a pretty small hat.
As luck would have it I was babysitting a 5 year old and was waiting for him to come home from school.  I thought he'd be a perfect model, so I could tell what size the hat should be and how to adjust it.  I was prepared if he fell in love with it to let him have it.
I thought I'd have to coax it on him, because he's all boy ruff and tumble, snip and snails and puppy dog tails.  He's still 5 and instantly fell in love with it and wouldn't take it off.  Made me feel good that he loved it as much as I did.  I did find out it is still a little smaller than I'd like, but for just wearing and having fun it was perfect.
Since I was knitting at someone else's home I didn't have all my manuals with me and as it always is I needed to make an i-cord and didn't know how to set my machine.  I knew it needed to slip in one direction, but I so seldom set my machine to slip anything I need the manual.  I did have my computer and all I could find was how to make i-cord on a brother machine.  I needed Studio.  I came across this handy little video that was perfect and saved the day.  I-Cord by Crystal Sutherland.  It is a manual way of making i-cord using knitting machine needles.  Since I only needed to make a small stem on my hat making i-cord in this manner was still faster than using knitting needles.  I hung 3 stitches from the top of my hat and began.  To get my rhythm going I just remember to always wind in a clockwise manner.
Wednesday, August 21, 2013

Twisty Shawl

Had some time today and decided to work on Linda Jensen's Twisty Shawl.  Not much of a pattern and I didn't take... well... any notes to clarify Linda's notes.  I've vowed to be a better note taker in the future.  While I'm sitting there watching the demonstration I think, "I got this" and don't take very many if any notes.  Then a few months later when I try the pattern or technique I have so many questions.  So, decided to just jump in and answer my questions as I went.  Like "What do I do if I don't have that pattern for the tuck stitch?"  "What kind of cast on did you use?"  "What kind of yarn works with this pattern?"  I picked a couple punch cards and knitted until a punch card made a pattern I liked.  I e-wrapped since that side is going to be sewn up I figured the edge didn't need to look pretty.  I had a thinner pretty wool and it knitted up nicely.  It's not as drappy as I'd like, but I think it will work out nicely any ways.


Linda gave this pattern out in the class she gave.  I used my bulky machine with a punch card.  It's a rectangle 52 inches long.  I think I might make mine a few inches shorter.  This was falling off my shoulders.  I made this for my mom and I think it will be just right for her.  She's going to love it.


Friday, July 26, 2013

Very Berry Ripple Top

OK got the top done!!  Sewing it together was a breeze.  It fits perfectly and I really like it.  Of course there are a few things I'd change if and when I make another.  I'd like it a bit longer.  I'd like the top ripple to not be quite as revealing as it is.  Being a proper lady (snicker snort) I don't like that one's bra is very visible.  So, I wear a nude colored tank under it. 
 Dear daughter asked me to pose like a model.  Well, shoot I need more practice.
I don't know how she got this shot, but I think it's kind of neat that the top is in focus.

Thursday, June 27, 2013

Redeeming Myself, But Not Without A Load of Trouble

When my other half of my ripple top came off the machine last week 10 rows too short I was suggested many ways to fix it.  Make it the front and have it short.  Gather up the long side as you sew the sides.  Make a whole other side and throw this one away.  My only thought was to rip it back and do it right.  I wrestled with this bad boy today.  Throwing it away, became a viable option a few times.

I knew I needed to rip back all the neckline and 7 rows of ripple stitching.  After that was done I realized I need to rip back the 2 rows of underarm decreases too.  That's when I remembered the loop about 10 rows below.  I had originally thought I'd just let it go.  It was close to the side seam.  I'd just tack it down some how.  Since I was already ripping back what the heck let's just rip back and fix this loop too.  Have you heard "No good deed goes unpunished."  Well, that's how my day of knitting went.

It took me 1 1/2 hours to get it on the needles and ready to continue stockinette.  After all the ripping back.  I didn't get it on the correctly numbered needles, but thought that would be OK.  As I started knitting I noticed my row counter wasn't adding correctly.  I had knitted 2 rows and it said 4.  Maybe this is where my trouble began... a faulty row counter?  hmmm.  I corrected the RC and started knitting my 21 rows.  The row counter add correctly while I was watching it like a hawk.  Because I was watching the RC I ended up with knots, loops, dropped stitches during that 21 rows.  I've never ripped back so much in my life.  It was 11:30 am now and my machine knitting meeting is over at noon.  I thought I'll scrap it off and finish another time.  We had a small group today just us regulars.  They encouraged me to keep on knitting that there was no hurry to give up our room or time limit for them to lock up.  I really didn't know how much more time I needed to finish.

So, I'm at the part where the pattern has one making the ripple stitch, which is the beginning of the sleeves.  Now the fact that the knitting isn't on the correct needles has just come back to bite me in the butt.  I scrap it off the machine and rehang on the correct needles.  This pattern uses all my needle bed.  The knitting has to be on the correct needles, so the sleeves can be made.

I begin the ripple stitched sleeves and of course there are some dropped stitches from rehanging doubled stitches back on the machine.  At this point I'm beginning to become brain dead.  I can't figure out how to latch up a dropped stitch.  Duh I know how to do this, but right now I can't figure out from which side the latch hook needs to come to accomplish this.  Thank goodness for my machine knitting friends and their encouragement as they are still here knitting themselves.  I yell, "Becky!  I dropped a stitch and I can't figure out how to fix it."  She tries to teach me and realizes, "Ahh just move over" she fixes my dropped stitch.  I continue on with my ripple stitch chanting to myself "3 forward, 2 back."  I timed myself and it took me 4 minutes to do one row of ripple stitches.  I need to get 7 done.  This is of course if everything goes smoothly.  The knitting is getting hung up on the gate pegs.  More loops of yarn.  Why O why am I having such a hard time today.  It took me more time to do half a sweater than it took me to one whole side.

Becky and Hugh patiently waited for me to complete my ripple sweater.  They were so happy for me as I excitedly pulled the completed side off the machine.  I matched it up with the front side of my sweater and they were the same length.  Hallelujah Amen is all I have to say.  Now to start sewing it up, so I can wear it!

Wednesday, June 19, 2013

Machine Knitting Bozo!

That's what I felt like yesterday when I found out the other half of the top I was making turned out 10 rows short.  I used the row counter and everything.  How the heck I knitted 60 rows instead of 70 I'll never know.  When I was doing the 70 rows of stockinette it did feel like it went faster than the first time.  Isn't that how things feel normally?  They also feel faster when you inadvertently knit 10 rows less too.  Here's pictures of  the front and the properly row counted piece.

It's beautiful in the picture, but you can't really get the full beauty of this yarn.  In person you just want to drape it on a scoop of vanilla ice cream and eat it with a spoon.  I'm calling this top Very Berry Ripple.  It is a Linda Jensen pattern called Ripple Top.  It's super easy to make and knits up quickly... when you don't have to rip back and correct a mistake.  She's gone pdf so you can get this pattern NOW and be wearing it tomorrow.


Monday, April 29, 2013

Linda Jensen Goes PDF!

One of my favorite machine knit pattern writers is going PDF.  I don't mean "pretty darn fast," but that's what it will mean to us machine knitters.  We can now buy one of her patterns and download right now.  In the past you'd buy a pattern and she'd mail you a beautifully printed pattern (when she wasn't on vacation.)  When some of my fellow machine knitters wanted a pattern and I'd say, "Go to her Etsy site, pay for the pattern and she'll mail it to you."  The response would be "WHAT?!  I can't download it right now?"  Honestly, I don't know why it was such a big deal as I have several of her patterns and all were mailed.  Snail mail doesn't take that long.

I guess in this day and age of computers instant gratification runs rampant and one has to adjust.  I think this will be beneficial for all.  We can get a pattern as quickly as it takes our printer to print one out and hopefully she'll get more sales.

Tuesday, April 23, 2013

Preemie Hats on a Sunny Day

Today was the meeting of a group of machine knitters I've known for about 3 years now.  I really enjoy getting together with these ladies.  We talk about our machine knitting endeavors of the past month.  Share some hand knitting projects.  We have lunch together.  Then we'll either demonstrate a technique or a pattern.  Today the meeting was at Susan's house and she decided we'd make preemie hats for donation to our local hospital.  Susan is great about collecting hats and blankets that we've made and getting them to a worth charity.  Not to mention all the knitting and crocheting she does on her own for charity.  She'll take knitted square donations and turn them into a beautiful lap blankets for charity.  So, when she asks for knitting help I ask, "What do you need?"

Susan set up 3 standard knitting machines for us to work on.  After lunch we got right on it.  Pairing up and using a pattern she provided.  At first I read the pattern to my friend Desiree as she knitted a hat.  As she sewed up her hat I knitted my hat.  Desiree helped me knit on a Brother machine.  I have zero experience with them.  It was a lot of fun picking out a pattern for an electronic machine.  She showed me how to zero in on the part of the pattern I wanted to knit.  Then helped me fix a mistake that was probably made by me, but we blamed it on the electronics.  It doesn't talk back.

After about 2 hours our group had 7 hats ready for some precious preemie baby heads.  My son was a preemie and I still have the little knitted hat he was given in the hospital.  Saving it for Grand kids, but now that I think about it I hope none of them are preemies.  I may have to rethink that and just keep it as a memento.  A remembrance of a serious time in my child's life and the good thoughts sent my way by a sweet stranger.

See my Ravelry project for details on how I made this particular hat.

Wednesday, March 13, 2013

Kool-Aide Dyeing on a Beautiful Spring Day

Carolyn invited Bonnie and I over for a day of lunch, machine knitting discussion and Kool-Aide dyeing.  Lunch was wonderful, but before we ate we got our yarn dyeing.  Carolyn gave me some yarn as I didn't have any wool to dye.  Thought I'd just watch them dye.  It really was a lot of fun to participate.  Her thoughts were to get the yarn wound and tied into hanks.  Add dye and water to the yarn in 1 quart Mason jars.  Then set the jars in her solar oven to make sure they got hot enough.  We all didn't do any reading up on what to do, but we all had a little bit of knowledge and vague memories of doing it in the past.  So, we all went about dyeing our hanks in different ways.

After soaking my hank in a vinegar solution I laid my hank on the lawn (didn't want to mess up Carolyn's kitchen) and I sprinkled a package of Grape Kool-Aide and a package of Ice Blue Berry Lemonade Kool-Aide on both sides of my hank.  I didn't randomly come up with these flavors.  I used a chart on the Dye Your Yarn website.  Then I stuffed it into the Mason jar and added hot water until the jar was full.  Shook it up until I thought all the Kool-Aide was mixed.  It was interesting as the yarn quickly turned purply pink and the water around it was blue.  Very pretty.

Carolyn and Bonnie mixed their colors in water before adding it to the jar with their yarn in it.  They then topped off the colored water with more hot water.  Their color choices were completely different from mine. It was getting very exciting to think about how things were going to turn out with our little experiments.

Carolyn placed all our jars into the solar oven.  We had lunch and talked every thing fiber for several hours before they thought to check on our yarn.  When we peeked in the oven the water around our yarn was clear, so we knew it was done.  We needed hot mitts as the solar oven had gotten up to 200 degrees F.
I drained my jar, rinsed my yarn and hung it to dry on a near by tree.  My yarn came out the most variegated in color.  Probably due to my sprinkling technique.
Bonnie's yarn from the left was purple and the next hank a beautiful tan with yellowish highlights.  She had a little bit of variegating.  Carolyn's roving on the right was a mint green color.  Sorry the sun wasn't helping with the photographing.  I'm curious to see what we all do with our lovely colored and great smelling fiber.

Monday, March 4, 2013

Fingerless Gloves by Karalyn

Karalyn Rainey came to visit our guild (MKGSFBA) last month and had wonderful projects to teach.  I loved her enthusiasm for machine knitting.  When there were left over patterns I asked if she minded if I shared them with the Sacramento Guild (SMKG).  She said, "No, I love to share."  After I got back to Sacramento and started sharing everyone loved the patterns.  I started getting emails for me to share the patterns.  I felt I should check with Karalyn one more time.  Sharing here in Sacramento is one thing, but putting it on the internet just seemed like something I wanted permission for.  She emailed me back, "Hi, it's fine please share my patterns they are free to all, I just want people to knit and share our love of machine knitting with everyone."  I think I love you Karalyn!  That's exactly what I like to do.  I like empowering machine knitters of all levels with patterns they can be successful with.  Nothing makes one want to knit more than getting a project done that they are proud of.

Here is a picture of Karalyn's fingerless glove on my hand.  Back of glove.  Can you believe she does this on a bulky knitting machine?!

Here is my glove using the double gate peg bind off for more stretch for the fingers.  Bonnie found out that the bind off where the glove goes around your hand is a little tight for her liking.  She felt her fingers were confined.  I tried them on and could see why it would be bothersome.  I didn't mind, but I think my daughter wouldn't like it either.  Carolyn from our guild had an idea to bind off around 2 gate pegs.  I did this on my glove and it does give a stretchier edge.


Cabling requires some concentration for me.  There are a couple places where I've gone wrong.  I've added cheat sheet notes on my pattern to keep me straight.

Here is the pair she gave to our guild member Bonnie.  Bonnie experimented with doing a Bickford seam on the side.  The seams looked great.  Now to weave in the ends.  The Bickford seams create the flattest seams frequently used for socks done on a flat bed machine.  Several tutorials on how to do this online.  One here done by Marg Coe.  Another one here at Knittsings.


Here is Bonnie's glove just getting past the thumbs.  Cable looking beautiful.
Here's my glove off the machine.  See why Karalyn calls it the Cactus glove?
Without further adieu here is Karalyn's pattern.


Cactus Fingerless Glove
Instructor, Karalyn Rainey
2010


Bulky Machine
Tension 6
Lion Brand Wool-Ease 2ozs.

Left Hand
Chain cast on 27 sts (LI3-RI4)
If you are putting a cable, knit 2 rows and twist the first cable
Cable needles are right needles 5,6,7,8, after the first twist you are going
to twist the cable every 4 rows
Knit to row 26 twisting the cable every 4 rows
On row 26 start increasing on both sides every other row (EOR) by
moving one st out and filling up the empty needle with the heal of the
inside st

Continue increasing to row 38 you now have increased 6 sts on each side
COR set the machine to hold, put all st except the 6 st on the right to
hold, knit 7 rows on those 6 st, RC46, bind off, move carriage to the left
COL put the 6 st on the left to work knit 7 rows, bind off
You should only have 27 st left, knit 13 rows don't forget to twist your
cable while you are knitting the 13 rows, bind off


Right Hand
You are going to make another one just like the one you did except cast
on 27 st (L14-R13) and the cable needles are going to be on the
Left side, left needles 5,6,7,8.

Sew up the side seam and the thumb seam.
If you haven't seen the flat seam that we do on the flat sock you need to
have me show you that seam it looks great on the fingerless glove!

Tuesday, February 26, 2013

Two Completely Different Sizes

Slippers is what I'm talking about.  I knew if I made them on different machines this could happen, but that they'd be so different surprised me.  I made one at the SMKG with my bulky Toyota KS650.  The other I made at home with my bulky Studio MOD. 155.  What a difference!

Now I know when I made the one on the Toyota I didn't change the tension for the outer slipper.  My question to myself is what tension did I use for that slipper?  OK opened up my traveling machine (Toyota) and the tension I used for the inner and outer slipper was 9.

The pattern has three different tensions mentioned, 8, 9, and 10.

The slipper I did at home last night was tension 9 for the inner and 10 for the outer.  So, I'll have to do some unraveling of a slipper in order to get 2 that are the same size.  I'm anxious to try and felt a pair and see what I get.
The slipper on the left is the one I knitted on my Studio MOD. 155 T9 for the inner and T10 for the outer.  The slipper on the right was knitted on my Toyota KS650 T9 for inner and outer.

Friday, February 15, 2013

Sacramento Area Machine Knitters Guild is alive and well

Just a reminder...

This blog entry is here to assist the Sacramento Area Machine Knitters Guild in advertising their meetings on the Internet. I hope you will stop by one of our meetings and share your latest project with us!

Meet with local Machine Knitters. Chat and discuss the art of machine knitting. All machines brands users are welcome, from the Brother, Bond to the Electronic Passap.

Sacramento Machine Knitters Guild, meets on the 2nd & 4th Thursdays 10am-noon (we meet throughout the summer at our normal days and times if there is enough interest).

We meet at St. Andrews United Methodist Church, 6201 Spruce Avenue, Sacramento, CA (off I-80 at Greenback exit, turn right at first street, up about 2 blocks, bear right at the curve and the church is straight ahead).

Contact Marilynn (pronounced Mary Lynn) Wright at 916-331-2309 for more information about the Guild and upcoming training topics.

Karalyn's Machine Knit Felted Clog Slippers

This past weekend at the MKGSFBA guild meeting we had Karalyn Rainey from San Diego come and teach us some of her favorite patterns.  The first one we all just loved was the Clog Slipper.  She made it sound so simple.  Really it's not difficult, but it's just knowing how to do it.  That's the value of these guild meetings.  The pattern can be found at the MKGSD website in their free patterns section.
 
OK first off so sorry for the blurry photo.  Sometimes the photos look so good on the little screen then I get them home on the big computer screen and BLUR!  You get the idea though.  This is what the slipper looks like right off the knitting machine.  I thought it was valuable to know this.  Yes, this is Karalyn Rainey holding the project up fresh off the needles.  She is from the San Diego area and does a lot of machine knitting teaching down there.  Their Guild (MKGSD) can be found here.  We were very lucky to have her for the day at our guild (MKGSFBA) this past weekend. 
 
I took photos of her machine knit slipper in it's prefelted stage and felted.  It makes a size that will fit a woman's size 8 foot.  I'm about that and it was a tiny bit shorter than I'd want.  Karalyn says when felting keep and eye on it.  Different washers and yarns felt differently.  After it's felted like you want shape it to your foot and let it dry.

 I took photos of the slippers thinking I'd never see them again until I made my own.
 To my great surprise Karalyn raffled off many of her machine knit examples.  Guess who won the pair of machine knit slippers?  ME!  Below is a picture of Karalyn's slipper on the left.  My first attempt at following the pattern and my notes is on the right.  I was so surprised at how well I did.  My slipper is pretty rough and had a few mistakes here and there.  I made it at my Sacramento Machine Knitters Guild meeting.  My fellow knitters said not to worry about it that once felted no one would be able to see anything wrong with it.

Wednesday, February 6, 2013

Beanie on a Mid Gauge with Roberta

Just watched a youtube video by Roberta Kelley about doing a hand knit beanie on a midgauge machine.  She's got great tips for all projects as she works up her hat.  I really liked the idea of using a magnet to make sure latches are open when needed.  I also liked her solution for yarn that splits.  For me it's just realizing this is splitty yarn and accept it and take measures to make my project easier.  Her suggestion just close the latches!  Rather than me correcting the split stretched out stitches each and every time.

Monday, February 4, 2013

49er Silly Hats On The Bulky

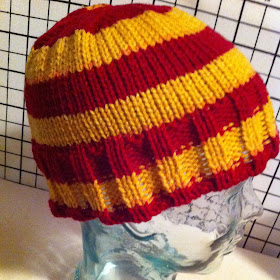
I bought some Red Heart yarn last year called Team Spirit.  This was the Burgundy/Gold combo that made me say "49ers!" when I saw it.  Then like most fiber artists I forgot all about it, but when the 49ers made it into the Super Bowl I thought "where's that yarn."  Fortunately, it popped right up in my craft room.
 
My first thought was to try the Beanie on a Bulky pattern now that I have a working ribber or so I hoped.  I took my Toyota KS 650 set up down last year as I couldn't figure out why the ribber stopped working.  I got a Studio MOD.155 and ribber for a song off Craiglist.  The machine has been cleaned, tuned and new sponge bar ready for over 6 months, but just never used the ribber. 
 
Since my last Beanie on a Bulky was a bit big I decided to reduce the number of needles in work to 80 and of course it threw the count off on the instructions I had.  I learned a lot doing this pattern a 2nd time.  First off my ribber works great.  Secondly, using my garter bar for doing the decreases was really hard at first.  STEEP learning curve and a bit of what I found out was loud cussing I was able to operate the garter bar for decreases.
 
 
Disappointingly the ribbing wasn't stretchy.  Could be the stiff Red Heart yarn?  Could be that the ribber doesn't do quite as nice ribbing as done by hand.  Don't get me wrong we loved the hat and wore it until the end of the Super Bowl and then some.  I think my daughter still has it on today as she wouldn't return it to me.  I was going to put it away until next football season.

I still had over a skein left of the Team Spirit yarn left and thought why not try and make one more hat.  I wanted to do something that had a completely different look than the first hat.  Something that would show off the color changes.  I really liked the idea of Diana natters on... Short-Rowed Baby Hat.  Could doing it on the bulky make it an adult sized hat without having to do many changes to the pattern?
I cast 26 needles and proceeded just like she says in the video.  When I got to 8 wedges done I measured the hat and thought it would fit.  BUT Each color represented 2 wedges of short rowing.  I would have had to Kitchener a gold wedge to a gold wedge and I didn't like the idea of what that would have looked like.  I didn't like that there would have been a large gold blotch on the back of the hat.  So, I did 10 wedges like Diana's video said to do.  I've been asked did I plan the color changes on the hat?  What kind of math did I use to get the colors to turn out so perfectly.  I'd love to pretend I was that clever in the planning of this hat, but honestly this is how the colors can right out of the skein.  Even I was surprised the color came out this way.  Fortunately, I just love it.
 The band for the hat was 80 needles. I knitted 24 rows no picot edging, because we ain't no babies. :D
My daughter liked the design and made suggestions on what to do for a 2nd hat.  So, my experiment was a success.  I got to thinking today of a hat I think was Diana's hat.  Kind of a beret.  Will have to look around.  I'm computer challenged today and running out of battery power.

49er Faithful!

I'm back and powered up.  It was Diana's Tam.  Not quite the shape I'm looking for at this time, but if you do a search of her site you'll see a lot of fabulous Tams with variegated yarn.

Thursday, January 24, 2013

Full Length Machine Knit Sweater

OK no snickering from the peanut gallery.  I'm no model especially of sweaters from the 80's, but I just loved this sweater.  Yes, the color, but maybe a less busy pattern,  I also loved the general shape of the sweater.  It was long, warm and well crafted.  I would love this pattern done in an up to date color and pattern.  Well, maybe done in my size too.  I like that it was light in weight, yet heavy in warmth.  Much better than the big ole coat I was wearing around while in China.  I would totally wear a sweater like this.  Hoping she still has the pattern.  OK who am I kidding of course she has the pattern.  She's very organized.

On a funny note the gal who made the sweater is a fabulous machine knitter.  She wanted to bring this sweater to the guild meeting to show what wonderful things can be done, but it was missing a button.  Now I jest about it being made in the 80's, but I'm not exaggerating that it was made in the 90's.  This gal thought how the heck am I going to match these buttons.  They are long barrel shaped black buttons.  To her great surprise the fabric store had the exact buttons still for sale.  She sewed one on to the front and one into the lining for future button failures.